Translate

Showing posts with label Stencil. Show all posts

Saturday, July 22, 2023

Starry Camper


Followed Sketch #595 at Freshly Made Sketches to create this card for a guy who loves to camp. I was inspired by Cindy's card entry to use a stencil for my starry background, so I also entered this card in the Anything Goes Challenge at Happy Little Stampers. I smooshed VersaMark through the star stencil then embossed the stars with silver glittery embossing powder. Found some old SU designer paper that had the perfect pattern for the teepee/tent and as a bonus, the reverse side was perfect for the trees. The Happy Camper title was cut from another piece of designer paper, though it is a little difficult to see it very well. Was going to forgo embellishments, but had a 'happy accident' with the glue, so had to cover it up. I actually like how the blue dots add a subtle coordinating touch. Thanks for stopping by!
 
Darker photo shows stars better


Supplies Used: 
Dies; Momenta: Happy Camper; Lawn Fawn: Happy Trails;
Ink: Distress Oxide; VersaMark;
Paper: Stampin' Up
Stencil: Heidi Swap: Spray Stencil;
Other: Nuvo Drops; silver embossing powder


Saturday, August 27, 2022

Fusion Seagull Beach Challenge Card #1


I just loved the summery colors chosen for the Seagull Beach Challenge at Fusion! For my entry, I used both the sketch and the color palette to create my card. I struggle with young adult birthday cards but I thought this whimsy flower stamp fit the bill. The colors are perfect for a young lady whose 29th birthday is in late summer. I had fun choosing the inks to match up with the challenge - I think they go so well together! I decided to stencil a few light pink circles for a background, and then I framed the whole panel in gray. Such a fun challenge! I had some extra circles left over, so I made a second card too. TFL!


Supplies Used: 
Stamps: The Stamps Of Life: Back2Basics; My Sentiments Exactly: 
Inspirational Birthday Innies & Outies
Dies: MFT: A2 Stitched Rectangles Stax; 1" Punch
Inks: Colorbox: Sky Blue and Mint; Altenew: Sand Dunes; MFT: Cement Gray; Gina K: Blush; Distress Oxide: Spun Sugar
Paper: MFT: Cement Gray
Other: Heidi Swapp Stencil


Saturday, June 20, 2020

Father's Day Card in Earth Tones


Using the sketch at Freshly Made SketchesI set out to create a simple card for Father's Day. Instead of just using designer paper for the background, I decided to spruce it up a bit by stenciling one using Distress Inks. I inked up Altenew's Cube Builder Stencil, but decided to keep the design simple by only creating rows of diamonds rather than rows of cubes. I chose warm colors for an outdoor/woodsy feel, and used the bear and deer from the Let's All Party Die Set for accents. Stamped the sentiment onto the inside piece of a fancy frame die, added a few rhinestones and finished my card. TFL!

Supplies Used: 
Paper: We R Memory Keepers: Happy Campers
Stamps: Paper Inspirations: Happy Father's Day
Stencil: Altenew: Cube Builder
Inks: VersaFine: Vintage Sepia, Distress: Wild Honey, Peeled Paint, Fossilzed Amber, Tea Dye and Walnut Stain
Dies: Spellbinders: Let's All Party and Twisted Metal Tags and Accents


Saturday, February 23, 2019

Azaleas and a long-lost stenciled background

I have spent a lot of time with my craft supplies these last few days. I needed a project to work on while listening to a series of talks, so I decided to try to make  one of the DIY Ink Storage Units that I found on Pinterest. Once that was completed, I had to rearrange my other storage units to make room for the new one. That led to me basically tearing apart my current set-up and rediscovering oh so many things that were made long ago but forgotten and hidden away. One of those treasures was the piece that I used for the background of this card. I know I used Distress Inks, but I can't remember exactly which ones. I'm thinking it was Seedless Preserves, Wilted Violet and maybe some Worn Lipstick. At any rate, it matched my Violet-colored Azaleas, so I was happy! I was going to enter this into the challenge at splitcoaststampers.com, but I didn't want to split the background so then I wasn't sure if this card would be eligible. So of course I had to go ahead and make another card so that I could enter the challenge! One of the hardest things for me to do is to cut an image that I spent so much time coloring....and that flower stamp is so pretty! But I really do like the look of the ovals for a focal point. I added a simple sentiment embossed in white and finished it off with two Nuvo Drops. 
   
Supplies:
Paper: X-Press It Blending Card, violet cs 
Stamps: Power Poppy: Azalea, My Sentiments Exactly: Inspirational Birthday Innies & Outies
Ink: Distress: various, Memento: Tuxedo Black, Copics
Dies: Nestabilities: Ovals and Card Creator
Other: Stencil: Memory Box: Texture Flourish, Wendy Vecchi: Embossing Paste, Nuvo Crystal Drops: Sweet Lilac

Friday, June 23, 2017

Sailboat with Vivid Sunset

Made this card for my dear father-in-law for Father's Day. First, I colored the sailboats and water swirl stamped images with Copics. I then used distress inks to ink up the water using the stencil that came with the Sailboat Stamps. I then masked off the stenciled water, created a circle mask for the setting sun and inked up the background using distress inks. I fussy-cut the sailboats and water swirls and glued them to the panel which was then mounted on brown cardstock which really made the colors pop. I just love how the copics blend to create such beautiful variations of color. TFL!

Supplies Used:
Inks: Copics, Memento Tuxedo Black, Distress
Stamps/Stencil: Stampendous Cling Sailboats & Stencil Set


Friday, January 13, 2017

Freshly Made for You

I'm still recovering from the holidays, but while there are still a few things left to do to put my house back in order, I sorely needed to kick back and create! I followed the sketch at Freshly Made Sketches #270 and created an ombre look using distress inks for the Less Is More #310 - Colour Challenge - for which I JUST missed the deadline. UGH! Oh well, it was fun to do:
I applied the various blue inks through a stencil, then paired the blues with a range of purples for an accent. These are my two favorite colors, I tend to use them often! Added some black foam to the 'You' for shadow and extra dimension. Thanks for stopping by!


Supplies Used:
Inks: Distress in Tumbled Glass, Broken China, Mermaid Lagoon, Milled Lavender, Wilted Violet and Dusty Concord, Memento Tuxedo Black
Dies: Simon Says Stamp: You, Nestabilities: Rose Creations
Stamps: Simon Says Stamp: You Matter, Heartfelt Creations: Botanical Floral 2
Stencil: Tim Holtz Latticework 


Sunday, August 21, 2016

CAS(E) this Sketch #185


This is the second card I am entering in ColourQ Challenge #354 (I hope multiple entries are allowed!). I have a feeling I am going to use this combo again & again because it is so striking! Again, I used a pretty blue rose but this time I used Sizzix Swirls instead of the MFT Medium Flourish. I think swirls/flourishes are so versatile, I imagine one can never have enough of these in one's stash! I added some black hearts under this sentiment and also used the more detailed leaf stamps from Altenew. The Vinatage Roses Stamps/Dies are one of my all-time favorites. It takes a little practice to get the layers lined up, but once they are just right, the MISTI makes creating multiple images incredibly easy. That tool is worth every penny! I'm also entering this card in the CAS(E) this Sketch #185 Challenge. TFL!


I was inspired by this awesome card by Wanda Cullen (sorry for not referencing this sooner):


Supplies Used:
Stamps: SSS: Happy (sentiment) and Sending & Wishing (hearts), Altenew: Vintage Roses
Ink: Distress: Black Soot, Memento: Tuxedo Black, London Fog and Bahama Blue, Stampabilities: Baby Blue, Colorbox: Cyan
Dies: Altenew: Vintage Roses, Sizzix Swirls
Other: SSS Diagonal Stripe Stencil, The Paper Studio scalloped scissors

Monday, August 15, 2016

Fab Friday 93


Oh how I just LOVE the color combo of ColourQ Challenge #354! This is the first of two cards I am entering in that challenge today. Wanted to use the gorgeous Vintage Roses Stamps & Dies and was very happy with how the cool blue rose turned out. When I saw the color challenge, I immediately decided to use my new diagonal stripe stencil in black. I cut a small scallop border on the blue paper before adhering my striped strip. The sentiment was stamped onto a piece of white cardstock I had die cut using the matting basics dies to which I added a black outline border with a marker. I stamped some plain, simple leaves in grey and tucked them under the rose and added a small scalloped strip of blue under the sentiment box. I'm also entering this card in the Fab Friday 93 Sketch Challenge. TFL!


I was inspired by this awesome card by Jen (sorry for not referencing sooner): 
Supplies Used:
Stamps: SSS: Happy (sentiment), Altenew: Vintage Roses
Ink: Distress: Black Soot, Memento: Tuxedo Black, London Fog and Bahama Blue, Stampabilities: Baby Blue, Colorbox: Cyan
Dies: MFT: Medium Fancy Flourish, Spellbinders: Card Creator A2 Matting Basics B, Altenew: Vintage Roses, Sizzix Swirls (leaves)
Other: SSS Diagonal Stripe Stencil, The Paper Studio scalloped scissors

Monday, March 7, 2016

More SU Flower Cards


While making my previous card for the Color Challenge at Splitcoast, I decided to take advantage of not only having all those supplies at the ready, but also having a plan that could easily be used to make several cards I need right now.  I figured I could crank out three more cards quickly....three hours later, I did have my additional cards, but not one is identical to another. I change my mind so often in the design process - I wonder how many other people do this?!

The basis for my cards was going to be the exact same: lattice stencil for background, a few flowers and leaves and maybe a small sentiment. The only thing that was going to be different was the color scheme. Two were for women, two for men, so I could have at least had two sets of identical cards! 

This first one was one of the simplest I've ever made. And I like it. I think I will definitely make more of these:

Maybe next time I will move the sentiment to the bottom right corner and put those candy dots on a vertical in the top right corner. And maybe I will use a fancy edge instead of the strip of solid paper, or maybe ribbon? I will probably pop-up the flower, and maybe even add a few more....in different colors.....oh dear, see where this is going? I can't stop!

My next two cards are really similar. It's the first time I used masking paper and while I love the sharp lines you get, I made the border too wide the first time. So when I expanded the stenciled area, I added more flowers to make the whole design 'bigger'. Then I thought the first card was too plain, so I added a purple colored pencil border around the stenciled area. 
Without Border


So in another attempt at making identical cards, I came away with four very different cards, though they all use similar elements. None of my flowers are identical, none of my background stencils look the same, and even though the only sentiment I used on the card fronts was the word 'hello', one is stamped, the other a die cut.

I did have fun experimenting with the different flower/color combos and coming up with a design or two I think I can repeat in the future.
Thanks for stopping by!

Supplies Used:
Stamps: Stampin' Up Flower Patch, sentiment from Hero Arts Truly Appreciated
Dies: Stampin' Up Flower Fair Framelits
Inks: Stampinp Up: Wild Wasabi, Pacific Point Tangerine Tango, Pool Party and Blushing Bride, Colorbox Heliotrope
Other: Tim Holtz Latticework Stencil

Tuesday Color Challenge

Inspired by last Tuesday's Color Challenge at Split Coast Stampers, I attempted yet again to make several cards at once to be more efficient. The first card I made used the colors for CC572, so I am posting it here. The other three were quite different, so they get their own post. 

I own both the Bright and Subtle Ink Pad Sets, so I was happy that I had all four of the colors for the challenge. I needed a masculine card, so I stamped the flowers using both shades of blue. I stenciled the Lattice Design in Real Red, then mat it with Real Red and Pacific Point. The sentiment was cut from Wild Wasabi then I finished off the card with some sequins and Candy Dots. 

Thanks to everyone over at Splitcoast for all their inspiration!

Supplies Used: 
Stamps: Stampin' Up Flower Patch
Dies: Stampin' Up Flower Fair Framelits, Technique Tuesday Say It - Hello Die
Inks: Stampin' Up: Wild Wasabi, Real Red, Marina Mist and Pacific Point
Paper: Stampin' Up: Wild Wasabi, Real Red and Pacific Point
Other: Tim Holtz Lattice Stencil, Stampin' Up Candy Dots, sequins

Monday, February 1, 2016

Embossed Flourishes

Created this lovely panel using the detailed Texture Flourish stencil from memory box. I stamped VersaMark over the stencil, sprinkled it with clear embossing powder, heat embossed it and sponged distress inks over the panel. I love the look of the finished panel! I added some flourishes, flowers and a button to complete the card.  I used TSOL's swirl stamps and a sentiment stamp from Our Daily Bread Designs to decorate the inside of the card. TFL!


SUPPLIES USED:
Stencil: memory box: Texture Flourish
Inks: VersaMark, Distress Evergreen Bough & Tumbled Glass
Stamps: Sizzix Swirls, Our Daily Bread Designs Flourished Verses
Dies: MFT Die-namics: Medium Fancy Flourish, Spellbinders Twisted Metal Tags & Accents
Other: teresa collins Tell Your Story Die Cut Flowers, button, embroidery floss
Paper: Bazzill Frosted Teal textured cardstock


Wednesday, January 20, 2016

Birthday Wishes


I followed the Sketch 575 from Splitcoaststampers. Lots of embossing and stenciling on this one! I used my new MISTI tool for all the stamping - every image is perfectly stamped and lined up. I love my new MISTI! Also got to use some new stamps and dies from Simon Says Stamp (SSS) along with some older ones from The Stamps of Life (TSOL). TFL!

Paper: The Paper Company (blue background), brown & white cs
Ink: VersaFine Vintage Sepia and Distress: Mustard Seed, Wild Honey, Spiced Marmalade, Fired Brick and Barn Door
Embossing: VersaMark, Clear EP, Wendy Vecchi Studio 490 Embossing Paste 
Stamps: SSS: Sending & Wishing, TSOL: hot4balloons
Dies: SSS: Wishing, Spellbinders Circles
Stencils: TSOL: Cupcake Die, small split chevron stencil from my stash


Wednesday, September 30, 2015

Bubbly Birthday


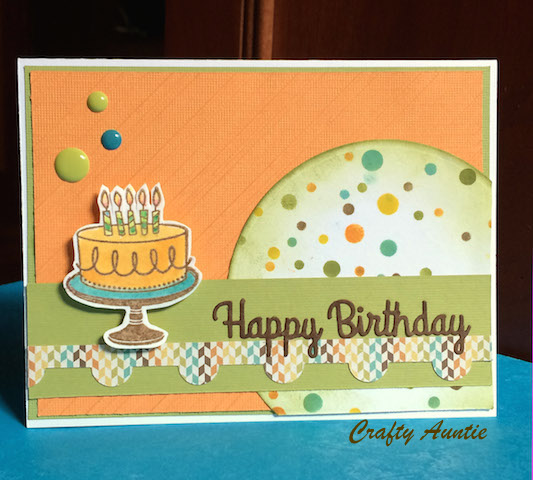
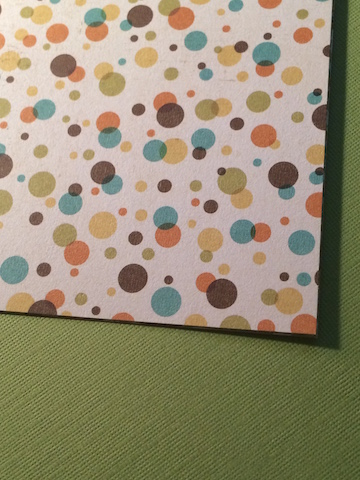
Made this birthday card using the  Sweet Sunday Sketch Challenge 287. Thankfully, that challenge is always open, as I didn't upload it before the next sketch was posted. Inspired by my paper pad from We R memory Keepers, I set out to use a bubble stencil & my distress inks to make my own version of their dotted paper. Only AFTER painstakingly sponging individual circles, I realized I should have just sponged the whole stencil in one color, then repositioned the stencil & sponge a second color - this would provide random colored dots much, much, faster than coloring the dots individually. Then the saddest realization hit me: why didn't I just USE the dotted paper provided in the paper pack?!! Ugh!!! Although, I did have fun sponging/stenciling and as practice makes perfect, my future attempts will now be easier & nicer (hopefully). 

I used an embossing folder for the background, embossed a cake image and colored it with the coordinating distress inks, added a border, sentiment & enamel dots. TFL!

Supplies Used:
Paper: We R Memory Keepers: Happy Campers
Inks: Tim Holtz Distress Inks: Spiced Marmalade, Peeled Paint, Peacock Feathers, Mustard Seed, Walnut Stain
Stamp: Hampton Art
Dies: Spellbinders: Circles, Classic Edges One, Sentiments One
Stencil: Heidi Swap
Embossing Folder: Darice Diagonal Stripe
Other: Recollections Enamel Dots 

The paper that inspired me to make my own version


Friday, June 26, 2015

Blue and Gold Graduation

Made another grad card using my Dreamweaver stencil and distress inks. I am entering this in the colourQ challenge #296. I paper pieced the graduation cap and tassel and added extra shine with the Wink of Stella pen. Thanks for looking!


Supplies: 
Paper: Ranger Speciality Stamping Paper
Dies: Spellbinders Sentiments One, Labels One & Circles, Sizzix Stars
Stamp: Northwoods
Ink: Distress Faded Jeans, Mustard Seed
Other: Wink of Stella Pen


Blue Grad Card

Love the new Dreamweaver stencil I picked up the other day. I don't have much experience with stencils yet, but I did learn that there is an enormous difference when you use the right paper with distress inks. The Ranger Speciality stamping paper (matte coated cardstock) allows the colors to glide over the paper so beautifully. Definitely going to have to stock up on that paper!

Supplies Used:
Paper: Ranger Specialty Stamping Paper, teresa collins Everyday Moments
Dies: Spellbinders Sentiments One, A2 Curved Borders One, Labels One & Circles, Sizzix Stars
Stamp: Northwoods

Ink: Distress Faded Jeans & Salty Ocean
Other: Sapphire ep, Dreamweaver Stencil

Monday, April 6, 2015

Spring Beauties

Almost identical cards (yay me!) except for two very important details....the first card has sequins, and the second card finally gave me an opportunity to use my air brush gun (that I got last MAY). Since I colored the second card's tulips a bit darker than the first, I wanted the label to match, so I tried out the air gun. A good chance to practice air brushing without worrying about ruining a huge background or anything. One thing I've learned about sequins, is that it isn't as easy as it looks to get them to stick. Luckily I later researched another tip from Jennifer McGuire about applying Ranger's Matte Medium with super-fine brushes and that works very well! TFL! 
Supplies Used:

Stamps: Penny Black Spring Beauties, TSOL sentiments
Inks: Copics, Distress Inks
Other: Tim Holtz Lattice Stencil, Nestabilities Labels One, CM Ovals, Sequins


Wednesday, May 21, 2014

More Stencilling

I just love stenciling with distress inks! I made this card to enter into the IC441 Challenge at SCS. The inspiration photo I used was this collection of candle holders.  I also tried the DIY enamel dots again, this time with more success. I also kind of created a tricky situation in adhering the twine behind the sentiment - but the three panels behind were adhered right to the card front, so I had to glue the twine to the back of the end panels while also adhering the panels themselves. I made a second card and ditched the twine. For all the effort, it didn't really add much to the card anyway. Live and learn...
TFL!


Closer look at the DIY enamel dots
Second, smaller card without twine

Supplies Used:
TH Latticework Stencil
TH Distress Inks in Barn Door, Mowed Lawn & Mustard Seed
Die: Spellbinders Twisted Metal Tags & Accents
Queen & Co. Green Twine
Stamp: TPC

Tuesday, May 13, 2014

Digital Tulips

I fell in love with the designs over at Power Poppy and was so impressed that I just to had to have one of their new digi stamps. I've been looking for more flowers to color with my beloved Copics, and now my only dilemma is that I want all of their stamps! I am adding this card to their Challenge (PPWORLD1) so maybe I will be the lucky winner of one of their stamp sets. TFL!
Supplies used:
Stamps: Tulip Digi from Power Poppy
Stencil: TH Latticework
Paper: Neenah Solar White, MME
Ink: Copics & TH Distress Inks
Die: Sizzix Scallop Frame